Replace "Older Posts" By the Numbers


In general, the navigation to move pages in blogspot typically use a link with the text "Older Posts" and "Newer Posts". Differences with wordpress that can navigate shaped figures that can make it easier to skip a few pages to the old and new posts.
The trick this time will explain how to change the link "Older Posts" and "Newer Posts" into numbers as shown below:


1. The first step of course should lead to the design of your template and then to "Edit HTML"
2. After that, find this code]]> </ b: skin> if you have found, put this script before the code


.showpageArea a {
text-decoration:underline;
}
.showpageNum a {
text-decoration:none;
border: 1px solid #cccccc;
margin:0 3px;
padding:3px;
}
.showpageNum a:hover {
border: 1px solid #cccccc;
background-color:#cccccc;
}
.showpagePoint {
color:#333;
text-decoration:none;
border: 1px solid #cccccc;
background: #cccccc;
margin:0 3px;
padding:3px;
}
.showpageOf {
text-decoration:none;
padding:3px;
margin: 0 3px 0 0;
}
.showpage a {
text-decoration:none;
border: 1px solid #cccccc;
padding:3px;
}
.showpage a:hover {
text-decoration:none;
}
.showpageNum a:link,.showpage a:link {
text-decoration:none;
color:#333333;
}

3. After that, find this code </ body> then put this script before the code.

<!--Page Navigation Starts-->
<b:if cond='data:blog.pageType != &quot;item&quot;'>
<b:if cond='data:blog.pageType != &quot;static_page&quot;'>
<script type='text/javascript'>
var pageCount=5;
var displayPageNum=5;
var upPageWord =&#39;Previous&#39;;
var downPageWord =&#39;Next&#39;;
</script>
<script src='http://bloggergadgets.googlecode.com/files/blogger_pagenavi_min.js' type='text/javascript'/>
</b:if> </b:if>
<!--Page Navigation Ends -->

If you've just seen the results.

How to change blogger templates

To change the blog template, please find a template you like in btemplates.com then save it to your computer.Then go to your blogger account, select a template and click the back up / restore, as pictured below.

 After that the menu will appear as shown below.

After that, press the search button and then locate the template file that has been saved earlier. and enter the formatted xml file and press upload to replace your template.

Press the view blog if you want to see the template that you just plug into your blog.

How to Sign Up to Google Adsense with Blogger

Before I tell you how to sign up on google adsense, you should first understand about Google Adsense.

About Google Adsense :
Google Adsense is a program launched by Google INC aimed at the owners of the blog / website to serve ads from businesses and entrepreneurs who want to promote their business.

Google Adsense and will provide payments to them as the owner of the blog / website that has been approved to become publisher ad, where ads are displayed on your blog / website they have been seen by visitors who really need the information from the ads.

How do I sign up to Google Adsense?
To register on google adsense, your blog has to have at least 10 articles -15 on the original article and blog already has a lot of visitors. for those still confused about how to create a blog please read HERE: How to Easily Create Free Personal Blog on Blogger.

Once your blog is ready, make sure the language setting of your blog using the English language. To change it go to your blogger account, then select Settings - Language and Formatting.


On the menu change with the English language and adjust your time zone settings with your country.


 Then refresh your browser page. After that will appear an additional menu income on your blogger account.


 After that press the start like in the picture below.

Further follow the registration procedure, fill in the data required with valid data.Once all that is done then your blog will be reviewed by the Google adsense. This observation can be quick and slow, it all depends on how quickly Google Adsense to crawl your blog pages.At this point, all you have to do is promote your blog so that your blog is visited by many people. And make 1-2 articles related to your blog content to support it.If your blog is still not considered worthy to be a publisher, then Google Adsense will soon give a reply to the email address you used to register. And if you got a reply email as below:Welcome to AdSense!We have completed a partial review of your application. However,You will not see the actual ad www.globalcakrastore.com/until we have completed the review of your site entirely. You willgot a blank ad instead, which combined with the backgroundsite. Once the review has been completed, your application will be fullyapproved or not approved. If approved, you will see adstrue.Soon after the ad began airing on your site, we will continue toreview your account for compliance with our policies. If detectedany breach, ad serving to your pages may be stopped orYour account is disabled. Every time you come across the ad does not show,we recommend that you log into your AdSense account and examine all existing alerts.So do not be happy yet, because this email is an email notification to you as the owner of the blog that Google Adsense will do a review for a second time and make sure that your blog deserves to be publishers. and you can go into your adsense account dashboard. You do this by clicking Income - Show Dashboard. Then you will be taken to your Adsense account home page.


 Then all you have to do is create a new ad unit and then paste your ad code on your blog. Keep posting articles and promote your blog. And within a few days you will receive an email response back that it might explain that you received or you may be rejected.

If your account is accepted then you will find a reply email that said this:

Congratulations!

Your Google AdSense application has been approved. To activate your
account and get started with AdSense


And here is an example of a blog / website that has been approved as a publisher :
www.globalcakrastore.com


Hopefully I have given useful tutorial for you.
Good luck :)


How to Easily Create Free Personal Blog on Blogger

How to Easily Create Free Personal Blog on Blogger | This time I am writing for your specialized knowledge that is less about how to easily create a personal free blog at blogger.com

1. The first requirement to be my friend do to create a blog on blogger.com is having an email account at gmail.com. By email at gmail.com has not blogger.com are accessible but all the facilities of google can be used. to create a gmail email account please type dibrowser pal gmail.com, or click here.
Then click create account.


 2. Once you click on the form would appear to be filled with your data, including your phone number. Once all the data on the contents click next step.


3. After that, select the text, Indonesian state, and click send verification code. Next you will receive an SMS verification code from Google to fill in the following steps.


Once entered click the verification code.

4. Furthermore enter your profile photo, but optional at this stage. you can directly enter a profile photo or not. if you want to get past just click next step.


5. In the next step just click Continue to Gmail.

6. Then it will immediately appear in front of your gmail account like this.


7. Up to this stage your gmail account has been created. now is the time to create your first personal blog .. ready?? Please click Blogger.com to start a blog.

8. You will be asked to return the password that you created earlier in gmail. Then click Login.


 9. Next you will be asked to fill out a profile data for your blog. Here there are two options, option 1 if you want to create a blog profile google + profile. option 2 if you just want to create a profile for a blog without a google account associated with +.
Google + is a fairly recent Google services, such as facebook account. I recommend option 1 only.


 10. In the next step just click the upgrade to continue.


 11. Click the Follow button if you want to join the page. Then click Continue


12. Enter your profile data and photos. Then click Finish.


 13. In the next step click Continue to blogger.


14. After that you will go straight to your blog dashboard page .. but the blog has not been made.

  
to start a blog, please click the New Blog number 1 shown in the image above, the number 2 will appear blog that you have created. the number 3 is the place to set your blog. one of which is to change the look of the dashboard to the old look. Ok then after you click the New Blog new form will appear as below.


 seen in the image above there are several numbers, deliberately so easy to explain.
at no 1 Enter a name for your blog, it's up to the content of what is going on, a personal name can be. for number 2 is to address your blog, like the example above is a blogger-naz.blogspot.com. the charging number two wait until there is a checklist blue as above. for the number 3 is the preferred design of your blog page, please choose according to taste. then click Create a blog.

 
15. Once completed then your blog has been created.


 to start writing please click the button with pencil.


in the example above is the title of my post "My First Post" .. post the content "Hello I now have a free blog. This is my first post" and the category "Coretanku" .. free pal would fill them with just about anything ..
Do not forget when you're done, Click Publish to display its news ..

 
16. after that try to see the results by clicking View blog.......


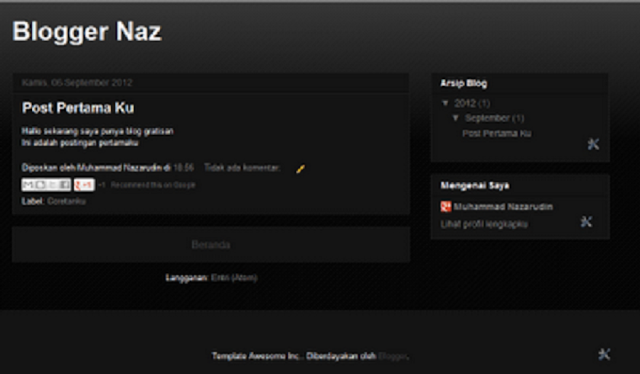
 Let's see an example of the post I made earlier ..


The last picture is the look of the blog that has been created with the title of the blog "Blogger Naz" and post with the title "My First Post" ...
Well that's about the steps to create a blog, create a post to publish the results of post .. The results of this blog is simple zoom,, if my friend wanted to be great, please kreasikan own imagination pal. This is the end of the tutorial How to Easily Create Free Personal Blog on Blogger. good luck


 So how to make money from your blog??

There are several ways such as:


1.
Google adsense (for English-language blog)


2.
AdsenseCamp (for Indonesian language blog)


Next article I will make about how to sign up on google adsense. :)